目前分類:軟體技術 (60)

瀏覽方式: 標題列表 簡短摘要

Existing lock /var/run/yum.pid: another copy is running錯誤解決

如果在安裝套裝軟體過程中出現以下錯誤
Existing lock /var/run/yum.pid: another copy is running. Aborting.錯誤,
Loading “installonlyn” plugin
Existing lock /var/run/yum.pid: another copy is running. Aborting.
如果出現上述錯誤,可以通過以下方法解決,在終端中輸入
[root@localhost ~]# rm -f /var/run/yum.pid
[root@localhost ~]# /etc/init.d/yum-updatesd stop
停止yum-updatesd:[確定]
列出倉庫可用包
#yum list available
升級系統
# yum update
檢查系統可用更新
# yum check-update


mybeauty 發表在 痞客邦 留言(0) 人氣()


phpBB 3 Language Pack

How to install a language pack in phpBB 3

Installing a language pack in phpBB3 can be done with just a few clicks. Go to your forum's admin area, select the System tab from the upper menu and click on the Language packs link on the left.


圖我傳不上,

原始內容在

http://www.siteground.com/tutorials/phpbb3/phpbb_language_pack.htm

Once the language is installed, select the General tab from the upper menu and then click on the Board configuration link from the left menu. Then from the drop-down menu next to the Default Language setting select the newly-installed language and click on the Submit button at the bottom of your screen.


Now when you visit your forum it will be displayed in the newly-installed language.


mybeauty 發表在 痞客邦 留言(0) 人氣()

馬上來打開IE看看剛安裝完成的網頁伺服器是否可以正常工作。但是很無奈,看樣子...失敗了!
其實這是很多人都會遇到的問題,安裝完WAMP後但網頁伺服器就是"起不來"!!

p1.jpg 


也許很多人都不知道,WAMP本身就已準備了一個簡單的測試方式,幫您看看為什麼網頁伺服器"起不來"
原來兇手是...Skype!?

p2.jpg 


把Skype關起來後,再重起一次WAMP,打開IE,耶..現在輸入本機的網址後就可以看到WAMP預設的網頁了!成功! (其實只要先開WAMP,再開Skype就2個程式都不會有問題,都可以用)

http://tw.network01.net/modules/newbb/viewtopic.php?topic_id=62&forum=4

這裡的介紹滿詳細的,可以看這篇文章。


skype 會佔住 80 port 的問題
可以參考下圖的設定
取消打勾 應該就可以解決了喔


p3.jpg 

mybeauty 發表在 痞客邦 留言(0) 人氣()

這裡是安裝教學,很簡單。
首先第一部你要先搞定你的ssh連線....通常我是裝openssh-server這個套件好像就搞定了....不過ssh博大精深,請另行研究。
在ssh server裝好之後,就要開始安裝nx server了:

$ sudo apt-get install python-software-properties #這步其實應該不用做,ubuntu預設就有裝這個套件了
$ sudo add-apt-repository ppa:freenx-team #這步其實讓我滿驚奇的,原來有這樣好用的工具可以用XD....
$ sudo apt-get update #加了套件庫,當然要update一下
$ sudo apt-get install neatx-server

咦?怎麼不是freenx了?而是一個叫做neatx-server的東西?他的套件說明是這樣的:
Neatx is an Open Source NX server.
Neatx is an Open Source NX server, similar to the commercial NX server from NoMachine.


mybeauty 發表在 痞客邦 留言(0) 人氣()

啟動 apache2 出現這錯誤訊息:
Could not reliably determine the server's fully qualified domain name, using 127.0.1.1 127.0.0.1 for ServerName

只要在 httpd.conf 或是 apache2.conf 裡面加上

ServerName  127.0.0.1

就不會出現了( localhost、Domain Name、IP,隨便一個加上去都可以)


mybeauty 發表在 痞客邦 留言(0) 人氣()

到這裡

http://search.cpan.org/dist/Encode-HanExtra/

下載Encode-HanExtra-0.23.tar.gz

然後解壓縮之後,

打入

#perl Makefile.PL

#make

#make test

#make install


這樣子就可以了

mybeauty 發表在 痞客邦 留言(1) 人氣()

Ubuntu系統無蝦米安裝程序:
步驟1-開啟【終端機】(註1)
步驟2-在終端機裡鍵入以下指令【sudo apt-get update;sudo apt-get install gcin】安裝Gcin輸入法
步驟3-安裝完後輸入指令【sudo im-switch -s gcin】
步驟4-接著輸入【wget http://edt1023.sayya.org/misc/noseeing-6.tar.gz】為下載無蝦米表格檔
步驟5-輸入【tar zxvf noseeing-6.tar.gz】解壓縮
步驟6-輸入【sudo cp noseeing.gtab /usr/share/gcin/table/】
步驟7-重新啟動系統後,即可使用Gcin內建的無蝦米輸入法(Gcin裡還有倉頡大易…等)

註1:Ubuntu終端機就像是Windows的DOS命令提示字元


mybeauty 發表在 痞客邦 留言(1) 人氣()

  以下是使用 C 語言的實作單向連結串列的使用實例:

#include <stdio.h>
#include <stdlib.h>

// 宣告節點結構
typedef struct ns
{
    int data;
    struct ns* next;
} node;

// 宣告相關函式
node* create_node(int);
void insert_node(node*, node*);
void remove_node(node*);
void print_lists(node*);
void free_lists(node*);

int main(void)
{
    // 宣告節點
    node* lists = create_node(0);
    node* a = create_node(1);
    node* b = create_node(2);
    node* c = create_node(3);
    node* d = create_node(4);
    node* e = create_node(5);

    // 0 -> 5
    insert_node(lists, e);

    // 0 -> 1 -> 5
    insert_node(lists, a);

    // 1 -> 2 -> 5
    insert_node(a, b);

    // 1 -> 3 -> 2
    insert_node(a, c);

    // 5 -> 4
    insert_node(e, d);

    print_lists(lists);
    free_lists(lists);

    system("pause");
}

node* create_node(int data)
{
    // 動態配置記憶體
    node* n = (node*)malloc(sizeof(node));

    n->data = data;
    n->next = NULL;

    return n;
}

void insert_node(node* n1, node* n2)
{
    n2->next = n1->next;
    n1->next = n2;
}

void remove_node(node* n1)
{
    n1->next = n1->next->next;
}

void print_lists(node* lists)
{
    node* n = lists;

    // 依序印出節點內容
    while (n != NULL)
    {
        printf("%d ", n->data);

        n = n->next;
    }

    printf("\n");
}

void free_lists(node* lists)
{
    // 遞迴刪除串列所有節點
    if (lists->next != NULL)
    {
        free_lists(lists->next);
    }

    free(lists);
}

mybeauty 發表在 痞客邦 留言(0) 人氣()

原文 http://way3sec.blogspot.com/2010/05/ubuntu-1004java.html


Ubuntu 10.04安裝JAVA

原來10.04的預設版本是open JDK啊

這東西實在不好用,還是換成sun官方的java好多了
網頁上看到的。

首先,進入系統->管理->軟體來源


並且在其他軟體裡面按下加入的按鈕,並且貼上:

deb http://archive.canonical.com/ lucid partner


apt-get install sun-java6-jdk sun-java6-plugin


途中會要你接受他們的license
你要用鍵盤將移標移到接受的地方按下
等安裝好之後,最後貼上


mybeauty 發表在 痞客邦 留言(0) 人氣()

來源:http://daydreamer.idv.tw/rewrite.php/read-33.html


前一陣子寫裝置管理軟體時,曾經有考慮過使用SQLite這個database,因為它的優點是簡單易用,體積小(56k),記憶體使用量少(100多k),所以我曾經寫一堆wrapper API,把它封裝成方便工程師呼叫的函式,不過後來因為效能和系統整合的考量,又寫了另外一套管理的軟體取代掉先前寫的東西,其實自從離開學校開始工作後,幾乎一個程式都會寫好幾個版本互相比較效能,看看有沒有一個time complexity 和space complexity的平衡點,所以我覺的在學校演算法的基礎要打好一點,ACM多玩一點,對自己幫助很多,不過最好的是能碰到功力高強的同學一起切磋,進步幅度會很快

真是抱歉講了一廢話,因為SQLite的使用實在太簡單了,連它的C API也很簡潔,所以我只好寫些東西充版面,在編譯前先執行cross compile shell script, cross compile shell script範例如下,toolchain也是用ELDK


#! /bin/sh 

export PATH=$PATH:/usr/local/eldk/usr/bin/

export CPPFLAGS="-I/usr/local/eldk/arm/usr/include" 

export LDFLAGS="" 

export CFLAGS="" 

export AR=arm-linux-ar 

export AS=arm-linux-as 

export LD=arm-linux-ld 

export RANLIB=arm-linux-ranlib 

export CC=arm-linux-gcc 

export NM=arm-linux-nm 

export ARCH=arm 


./configure --target=arm-linux \

--host=arm-linux \

--build=arm-linux-gnu \

--prefix=/usr/local/eldk/sql \

--exec-prefix=/usr/local/eldk/sql \

--disable-tcl


編譯完後,把.libs資料夾下的library和binary丟到板子上的/lib和/bin資料夾,記得要補上libdl和libphread這兩個library,執行SQLite會出現如下界面,這邊你可以下SQL command或其它特殊的指令,網路上有一篇文章講到大概的用法,請參考試用

sqlite.jpg 

而它提供的C API有夠簡單的,分為下面三組
(1) sqlite3_open:打開資料庫
(2) sqlite3_exec:執行SQL指令
(3) sqlite3_close:關閉資料庫
範例程式如下


    #include <stdio.h> 

#include "../sqlite3.h" 


static int callback(void *NotUsed, int argc, char **argv, char **azColName){ 

int i;

for(i=0; i<argc; i++){ 

printf("%s = %s\n", azColName[i], argv[i] ? argv[i] : "NULL");

} 

printf("\n");

return 0;

} 


int main(int argc, char **argv){ 

sqlite3 *db;

char *zErrMsg = 0;

int rc;


if( argc!=3 ){ 

fprintf(stderr, "Usage: %s DATABASE SQL-STATEMENT\n", argv[0]);

exit(1);

} 

rc = sqlite3_open(argv[1], &db);

if( rc ){ 

fprintf(stderr, "Can't open database: %s\n", sqlite3_errmsg(db));

sqlite3_close(db);

exit(1);

} 

rc = sqlite3_exec(db, argv[2], callback, 0, &zErrMsg);

if( rc!=SQLITE_OK ){ 

fprintf(stderr, "SQL error: %s\n", zErrMsg);

sqlite3_free(zErrMsg);

} 

sqlite3_close(db);

return 0;

}


mybeauty 發表在 痞客邦 留言(1) 人氣()

來源:http://support.oss.org.tw/?q=node/157

SQLite 簡介 (1)

介紹
    資料庫在處理大量的資料上是很必要的,但如果資料固定且量不多,或是資料庫只會在單機上使用,且沒有讓多人使用的需求的話,就不一定需要特別架一個資料庫系統;因此,可以使用類似 SQLite 這樣的嵌入式資料庫(embedded SQL database)。

    SQLite 與其他一般資料庫差異不大,一般的 SQL-92 語法都能夠使用,而且不需要建立一個資料庫系統,要使用的時候,只要在編譯程式的時候將 SQLite 程式庫一起編入就可以使用。另外,SQLite 的資料庫(database)都是以單一檔案的形式存於磁碟中,不需要再安裝資料庫伺服器軟體,所以要把資料庫複製或建立在你的電腦上是相單簡單快速。
SQLite 是一個很小的 C 語言程式庫,且本身就完全包含資料庫引擎的功能,而且可以嵌入至其他程式中,完全不用額外的設定。其特性如下:

  • 支援ACID (Atomic, Consistent, Isolated, Durable) transaction。
  • Zero-configuration:無須管理者的設定及管理。
  • 支援大部分SQL92的語法。
  • 資料庫存在於一個單一的檔案中。
  • 資料庫系統所在機器的位元組順序(Byte order)無關。
  • 支援大小至2 terabytes (2^41 bytes)。
  • 記憶體需求小:小於3萬行的C語言程式碼。小於250KB的程式空間。
  • 大部分的資料庫操作皆快於一般資料庫系統。
  • 簡單易用的API。
  • 支援TCL。也有其他語言的支援可用。
  • 註解詳細的程式碼,以及超過90%的測試。
  • 程式庫自己包含完整的功能,無須其他額外的程式或程式庫。
  • 為public domain,可免費使用。
  • serverless
  • cross-platform - 使用unicode
  • 不會進行data type檢查


安裝

for Linux(rpm)

I、下載 SQLite
# wget http://www.sqlite.org/sqlite-3.5.4.tar.gz
2、解壓縮與編譯
# tar zxvf sqlite-3.5.4.tar.gz
# cd sqlite-3.5.4
# ./configure
# make
# make install
ps.若make的時候有發生找不到tcl相關的library時,可以利用下列指令:
# ./configure --disable-tcl --prefix=/usr/local/sqlite-3.3.5
亦或者下載 sqlite 與 tcl 相關的 library 即可:
# apt-get install libsqlite3-tcl
 

for linux(套件管理程式安裝)

可以利用 apt-get(Ubuntu/Debian)或 yum(Fedora)來直接下載,
# apt-get install sqlite
 
若 SQLite 要與 PHP 搭配使用,則需要為 PHP 特別安裝套件,可利用各個 distros 的套件管理軟體來安裝(以Ubuntu為例):

  • for PHP4:

            # apt-get install php4-sqlite

  • for PHP5:

            # apt-get install php5-sqlite
 

for Windows

若要下載命令列模式的 SQLite 程式來存取與修改 SQLite 資料庫,可以至(http://www.sqlite.org/download.html)下載預先編譯過的程式。
 

 for PHP 4:

1、到這裡(http://pecl4win.php.net/ext.php/php_sqlite.dll)下載 php_sqlite.dll
2、php.ini 加上 extension=php_sqlite.dll
3、重新啟動 Web Server 即可。

forPHP 5:

PHP 5 已經包含 SQLite 模組了,所以只需要載入模組即可。
修改 php.ini,將 ;extension=php_sqlite.dll 將前面的分號去掉。
最後一樣重新啟動 Web Server 即可。
 

如何使用sqlite(command-line)

    以下我們就對建立資料庫、建立資料表、新增資料、查詢資料、更改資料、移除資料、sqlite 命令列選項等幾個項目做簡單的介紹。
1、建立資料庫檔案
用 sqlite 建立資料庫的方法很簡單,只要在 shell 下鍵入:
# sqlite db_name
 
如果目錄下沒有 db_name,sqlite 就會建立這個資料庫。
進入了sqlite之後,會看到以下文字:
SQLite version 2.8.17
Enter ".help" for instructions
sqlite>
 
這時如果使用.help可以取得求助,.quit則是離開
所有的SQL指令都是以分號(;)結尾的。如果遇到兩個減號(--)則代表註解,sqlite 會略過去。

2、建立資料表(table)

假設我們要建一個名叫 tbl 的資料表,只要鍵入以下指令就可以了:
sqlite > create table tbl(one, two);
 
這樣我們就建立了一個名叫 tbl 的資料表,裡面有 one、two 兩個欄位。
 
create table指令的語法為:
create table table_name(field1, field2, field3, ...);
 
table_name 是資料表的名稱,fieldx 則是欄位的名字。sqlite 的欄位不會檢查是屬於哪一種資料型態:sqlite的欄位可以儲存任何東西:文字、數字、大量文字(blob),它會在適時自動轉換。
 
3、加入一筆資料
接下來我們要加入資料了,語法為:
insert into table_name values(data1, data2, data3, ...);
例如
insert into tbl values ('hello!', 10);
insert into tbl values ('goodbye’, 20);
 
如果該欄位沒有資料,我們可以填NULL。
 

4、查詢資料

利用 SQL 語法裡的 select :

select columns from table_name where expression;
 
最常見的用法,當然是倒出所有資料庫的內容:
select * from tbl;
 
如果資料太多了,我們或許會想限制筆數:
select * from tbl limit 10;
 
有時候我們只想知道資料庫一共有多少筆資料:
select count(*) from film;
 

5、如何更改或刪除資料

瞭解 select 的用法非常重要,因為要在 sqlite 更改或刪除一筆資料,也是靠同樣的語法。
 
例如有一筆資料打錯了,可利用這樣的指令來修改:
update tbl set one = 'hello!' where one='hollo!';
 
就會把one欄位裡,被打成 hollo! 的那筆(或多筆)資料,改回成hello!。
 
其他 sqlite 的特別用法

1、sqlite 可以在 shell 底下直接執行命令:

sqlite3 foo.db "select * from tbl;"


2、資料庫備份:
 

sqlite3 ur_db.db ".dump" > output.sql


$ echo '.dump' | sqlite ur_db.db | gzip -c > ur_db.dump.gz
 

利用輸出的資料,可以建立一個相同的資料庫(其實就是標準的SQL資料庫備份):
 

sqlite3 film.db < output.sql

$ zcat ex1.dump.gz | sqlite3 ex2
 
3、查詢資料庫的 schema
資料庫的 schema 是特別存於名為 sqlite_master 的資料表,可利用 "SELECT" 指令來查詢,如下所示:
 
$ sqlite3 db_name
SQlite vresion 2.817
Enter ".help" for instructions
sqlite> select * from sqlite_master;
type = table
name = tbl
tbl_name = tbl
rootpage = 3
sql = create table tbl(title, length)
sqlite>
 
4、更改輸出的格式
sqlite 能夠將查詢的結果以8種不同的格式輸出(csv、column、html、insert、line、tabs、tcl),你可以利用指令 "mode" 來改變輸出格式,預設的格式為 list   ,在這個模式下,查詢的結果都是一行一行列出,而預設的分隔符號為 "|" ,如下所示:
 
sqlite> .mode list
sqlite> select * from tbl;
aaa|232
bbb|454
 
你也可以利用指令 ".separator" 來改變分隔符號,例如:
 
sqlite> .separator ", "
sqlite> select * from tbl;
aaa, 232
bbb, 454
sqlite>
 
在 "line" 模式中,每一個欄位都會獨自與一行顯示出來,而每一筆資料會以一個空行來分隔,如下所示:
 
sqlite> .mode line
sqlite> select * from tbl;
title = aaa
length = 232

title = bbb
length = 454
sqlite>
 
在 column 模式中,每一筆資料都會顯示於獨立的一列,並且以欄位來分隔,如下所示:
 
sqlite> .mode column
sqlite> select * from tbl;
title length
---------- ----------
aaa 232
bbb 454
sqlite>
 
另外一個有用的模式為 "insert",此模式的輸出格式類似於 SQL 語法中的 INSERT 格式,可用於日後要輸入資料於其他資料庫中:
 
sqlite> .mode insert
sqlite> select * from tbl;
INSERT INTO table VALUES('aaa',232);
INSERT INTO table VALUES('bbb',454);
sqlite>
 
最後一個輸出模式為 "html",此模式下 sqlite 會將查詢結果輸出為類似 XHTML 表格,如下所示:
 
sqlite> .mode html
sqlite> select * from tbl;
<TR><TH>title</TH><TH>length</TH></TR>
<TR><TD>aaa</TD>
<TD>232</TD>
</TR>
<TR><TD>bbb</TD>
<TD>454</TD>
</TR>
sqlite>
 
查詢資料庫的 schema
sqlite   提供很多方便且有用的指令來查詢資料庫的 schema:
列出資料庫中的資料表,利用 ".tables":
 
sqlite> .tables
tbl
sqlite>
 
".schema" 指令顯示出原來建立資料表與索引的指令,可以用於重建目前的資料庫用:
 
sqlite> .schema
create table tbl(title, length);
sqlite>
 
這邊就先介紹 SQLite 到這邊,我將會在下一篇說明如何在 PHP 上使用 SQLite。
 

mybeauty 發表在 痞客邦 留言(0) 人氣()

//big5可以拆成2個byte直接填進去

//  c2[0]=(char)0xb3;  c2[1]=(char)0x6f;  會輸出中文字「這」

#include <stdio.h>

int main()
{

  char *chinese="這是一個測試";

  char c2[14]="我要測試看看";

  //printf("%x",chinese[0],chinese[1]);

  //printf("chinese=%x %x",chinese[0],chinese[1]);
  c2[0]=(char)0xb3;
  c2[1]=(char)0x6f;

  printf("c2=%s",c2);

  return 0;

}


mybeauty 發表在 痞客邦 留言(0) 人氣()

下面的範例簡單又清楚

來源 http://ashotw.blogspot.com/2008/08/iconv.html


咳咳...在Linux的環境下,一想到轉碼,就會想到iconv!

對iconv,小弟都只聞其名、未深入體驗,這次剛好有個機會來嘗試。試著寫個簡單的小範例來轉換字串成UTF-8或是Big5。

PS:因為blogger不知道要怎麼顯示 <> 這樣的符號(會被辨試成delimiter),所以改用 "" 表示。


#include "iconv.h"
#include "string.h"
#include "stdlib.h"
#include "errno.h"

int main( int argc, char **argv )
{
iconv_t cd;
size_t in_s, out_s;

/* UTF-8 轉 Big5 */
cd = iconv_open("BIG-5", "UTF8");

char *ibuf = "我是阿信", *in_ptr;
char *obuf = NULL, *out_ptr;

in_s = strlen(ibuf);
in_ptr = ibuf;

obuf = malloc( in_s * 3 );
out_s = in_s * 3;
out_ptr = obuf;

if( cd == (iconv_t )-1 ){
fprintf( stderr, "error opening iconv \n" );
exit(1);
}

if( iconv( cd, &in_ptr, &in_s, &out_ptr, &out_s) == -1 ){
printf("errno: %s\n", strerror(errno));
}

*out_ptr = '\0';
printf("%s, %s\n",ibuf, obuf);

iconv_close( cd );
free( obuf );
return 0;
}

接下來就 gcc -Wall a.c -o a.out,開一個Big5的terminal,執行一下這個新生的a.out,就能看到轉換後的字串了。

mybeauty 發表在 痞客邦 留言(0) 人氣()

2009年7月14日星期二

由於工作上的需要,因此想在辦公室的電腦上架FTP,當然使用者只有我自己啦XD
而我裝的套件是vsftp,環境是Ubuntu 9.04

首先呢,當然就是安裝套件囉
$ sudo apt-get install vsftpd
OK,這樣就安裝完了,接下來就到了設定的步驟了。
有幾個檔案是vsftpd的相關設定檔:
/etc/vsftpd.conf
/etc/vsftpd.chroot_list

先說/etc/vsftpd.conf,這是vsftpd的主要設定檔,檔案中其實已有相當詳細的註解了。
所以在此僅提出幾個常用的設定
特別注意:修改設定檔前請先備份

# Allow anonymous FTP? (Beware - allowed by default if you comment this out).
anonymous_enable=NO
是否允許任意使用者連線,由於我只想給自己使用,所以設為NO

# Uncomment this to allow local users to log in.
local_enable=YES
是否允許本機使用者登入FTP,我使用自己的帳號登入,所以設為YES

# Uncomment this to enable any form of FTP write command.
write_enable=YES
是否開放寫入的權限,我的需求是下載及上傳資料,所以需要寫入的權限,設為YES

chroot_local_user=YES
chroot_list_enable=YES
chroot_list_file=/etc/vsftpd.chroot_list
這三個就有趣了,所以一起上XD
PS:chroot,就是讓使用者變換根目錄的功能,在登入FTP Server時,預設根目錄為使用者的home directory

chroot_local_user=YES
chroot_list_enable=YES
這樣的設定,讓所有使用者無法變換根目錄,除了/etc/vsftpd.chroot_list中所列的使用者

以上,如有錯誤請各位不吝指正,謝謝。
都改好了嗎?記得要重新啟動vsftp,才會生效

sudo /etc/init.d/vsftpd restart
 

mybeauty 發表在 痞客邦 留言(0) 人氣()

Ubuntu 9.04 telnet server 設定

安裝 telnet service

sudo apt-get install xinetd telnetd

安裝完成,設定一下吧!

sudo vi /etc/inetd.conf並加入以下一行

telnet stream tcp nowait telnetd /usr/sbin/tcpd /usr/sbin/in.telnetd

接下來新增 /etc/xinetd.d/telnet 這個檔案,讓telnetd自動開啟service

sudo vi /etc/xinetd.d/telnet


service telnet
{
disable = no
socket_type = stream
protocol = tcp
wait = no
user = telnetd
server = /usr/sbin/in.telnetd
}

mybeauty 發表在 痞客邦 留言(0) 人氣()

我用方法1,一下子就設好了。

----

Ubuntu安裝gcin和嘸蝦米輸入法((轉貼))

10/05/2009 23:09點閱次數 (1206)


今天參考安裝嘸蝦米輸入法於 Debian/Ubuntu(GCIN)的步驟安裝嘸蝦米輸入法,結果解壓縮到tmp時發生錯誤,於是直接跳過該步驟,就ok了,為了辦研習時可以讓同仁練習使用「終端機」安裝軟體,於是copy到這兒,方便使用。


步驟如下:

安裝Gcin (已經裝好,可省略此步驟)

  1. apt-get install gcin
  2. im-switch -s gcin
  3. 重新登入

安裝嘸蝦米輸入法:

方法一:

  1. 將下列一段copy後貼到終端機,就可將了:
    sudo /usr/share/gcin/script/noseeing-inst 
方法二:
  1. wget http://edt1023.sayya.org/misc/noseeing-6.tar.gz
    (下載 無蝦米的 table)
  2. tar zxvf noseeing-6.tar.gz
  3. mv noseeing.gtab ~/.gcin
  4. 重新登入, Gcin圖示按右鍵設定內定輸入法, 即可使用
內容修改自安裝嘸蝦米輸入法於 Debian/Ubuntu(GCIN)

=============================

有人提供了gcin安裝最新版的方法喔!

-------------------------------------------------------

Ubuntu 套件庫裡頭的版本卻是舊的。還好有好心人提供了一個套件來源,讓我們可以方便的更新到最新版本,只要照著以下的步驟就可以囉。 在 /etc/apt/sources.list 這個檔案加入「deb http://debian.luna.com.tw/ubuntu ./」這一行。 如果你對原始碼有興趣,就再加入「deb-src http://debian.luna.com.tw/ubuntu ./」這一行。 執行「sudo apt-get update」更新套件清單。 執行「sudo apt-get install gcin」安裝最新版本的 gcin,它如果有提示你必須額外安裝其他套件的話,就全都裝起來吧。 登出再登入,就可以開始使用囉。

以上來自[筆記] 給 Ubuntu 用的 gcin 套件庫-Nelson

mybeauty 發表在 痞客邦 留言(0) 人氣()

1. Install
$ sudo apt-get install nfs-common
$ sudo apt-get install nfs-kernel-server

2. 設定 /etc/exports (For example: 將/mnt/iso share給all net使用)
$ sudo vi /etc/exports
/mnt/iso *(ro,sync)

3. 啟動 nfs server
$ sudo /etc/init.d/nfs-kernel-server start

4. 檢查
$ showmount -e localhost
成功的話應該可以看到這樣的訊息:
Export list for localhost:
/mnt/iso *

mybeauty 發表在 痞客邦 留言(0) 人氣()

 vs.jpg


這一套軟體比較好,有字幕有轉場。

mybeauty 發表在 痞客邦 留言(0) 人氣()

這一篇超詳細,看一下吧

http://www.wretch.cc/blog/qazlove0315/5730381

mybeauty 發表在 痞客邦 留言(0) 人氣()

來源

http://wiki.pastwind.org/home/av_editor/aegisub_tutorial/zhi-zuo-di-yi-ge-zi-mu-dang


製作第一個字幕檔

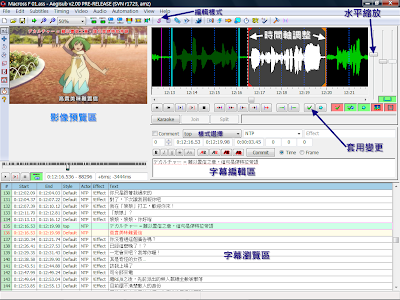
使用介面


製作字幕


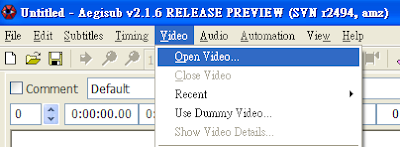
首先開啟影音檔,透過Video功能表中的Open Video來開啟檔案。


然後透過Audio功能表中的Open Audio from Video開啟聲音部份,這樣的作法比較慢,我通常是把影音檔的聲音部份抽出,再行處理。


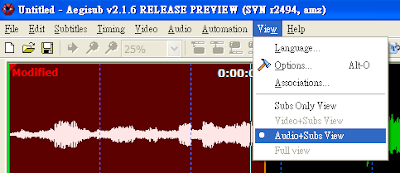
然後選擇View功能表中的Audio+Subs View,製作字幕只需要檢視音頻部份,影像只有在預覽字幕與調整字幕時才會用到。


在音頻模式,用滑鼠左鍵點擊決定語句的開始位置,用滑鼠右鍵點擊決定語句的結束位置,按下空白鍵來試聽目前選取的範圍,這裡的範圍是指畫面中由紅色(1)與橘色(2)邊線包圍住的暗紅色區域。如果想調整選取範圍,用滑鼠左鍵選取邊線並拖曳。
在標示3的部份輸入字幕文字,完成之後按Enter。然後重複以上步驟繼續編輯字幕。


字幕製作完成後,可以選擇View功能表中的Full View,進入開啟影像窗格進行預覽,直接用滑鼠點擊下方任一列字幕來觀看效果。或者點擊影像窗格左下角第一個播放鍵觀看實際播放效果。

mybeauty 發表在 痞客邦 留言(2) 人氣()

«123